Saturday 31 October 2015

Howl-o-ween

A late blog today and just a short one to give a nod to the fact that today is halloween and to share a picture of a little bag that I made and which is currently filled with a few sweets and is sitting ready by the front door incase any little visitors knock.
I will share more of these bags in a later post, but for now, have a sake night and don't eat too many sweets.

Helen
xx

Friday 30 October 2015

O Come All ye Faithful


I like to have traditional Nativity cards amongst my collection of cards to send out at Christmas, because I have friends connected with my Church life who I know appreciate this recognition of the first Christmas story. However, it isn't always easy to find good stamp sets.

I loved the simplicity of this "All ye Faithful" stamp set instantly. The line drawings give it a charm and versatility that appealed to me.

Because there are the three main images in the set, I instantly felt drawn to creating a triple easel card, which would give the illusion of the visitors gathering around this special family.I choose to make it monotone and picked pacific point. Mary is always depicted wearing blue. There are many theories, but one is that blue was one of the hardest and most expensive dies to create in ancient times, so if she was wearing blue, then she must be special indeed.


The Three Kings, or wise men, or Magi - I thought they deserved some gold. This picture doesn't do the card justice, because of the reflection on the mirri card. I embossed the gold background using the lucky stars textured impression embossing plate.Both the image of the Kings and the greeting were stamped in versamark and heat embossed with gold embossing powder. I then ran the versamark pad around the edge of the card and added gold embossing powder to this too. I used black cad to make my card blank and to stamp onto.


The shepherd and his lambs, simply stamped and coloured with the aqua painter. I love this little card. Very simple.


The proud parents stamped in smoky slate and an aqua painter used to drag in some of the grey. the only other colour added was yellow for the halo. I created the card base using the stars framelits - first cutting the base and then a silver frame to go on top. The base underneath is not a complete star because I ensured the top point of the star overlapped the fold in the card to ensure a hinge remained.

Table built using Product Table Builder by The Crafty Owl - Independent Stampin' Up! Demonstrator.

This is one of the stamp sets I intend to use at the fundraising afternoon I am running in partnership with our town centre Church. They are providing the tea and cake and I'm bringing the craft. If anyone would like to join us, we would love to see you.


Helen
xx


Thursday 29 October 2015

Back to the Wilderness


"The  Wilderness Awaits" is one of those stamp sets that has so much potential for so many techniques and with this Monday class a couple of weeks ago we explored a few.

For the ducks taking off, we had to do some masking - stamping onto a post it note and cutting out to use as a mask. You achieve the effect of one duck in front of the other by stamping the lower duck, covering it with your cut out mask and then stamping the second duck. Because the ink where the 2 images overlap goes onto the post it note and not onto your card front, once you have removed your mask, it gives the illusion of one duck behind the other.

Some gentle colouring in with an aqua marker, a greeting added and some banners punched from the "Go Wild" DSP stack.


I don't actually like this card, but because I liked the technique I have added the picture. The technique was to take some funky foam and heat it with your heat gun and then whilst it was warm stamp into it. It gives the look of stamped leather, which I like.Unfortunately I hadn't got any nice neutral shades of funky foam.This orange was the nearest I could find. I used my paper-piercing tool to create holes around the edge of the foam and drew in the faux stitching. I will get some more funky foam and give it another go, but meanwhile it is good for you to know that quite a few cards end up on the reject pile - and this is heading that way.


This magnificent stag on the other hand has been stamped and heat embossed in gold before being coloured in. Another post it note - this time punched out into a circle to act as a mask in the sky when I sponged it to leave a moon. I took the edge of my sponge and just added some wisps of colour across the face of the moon to relieve the starkness of the white, The rock on which the stag stands is some gold DSP from the neutrals stack that I have torn diagonally to create the mountainside.


I am sure this is a stamp set we shall return to again. Make the paper dazzling diamond glimmer paper, and give the stag a frosting of glitter and Merry Christmas everyone........

Helen
xx

Wednesday 28 October 2015

Happy Stampin Up Birthday to me.


Well it has been 2 years since I first signed on the dotted line with the lovely Samantha as my upline ( and she will kill me for putting this photo on here)and became a Stampin' Up demonstrator.

It has been a wonderful journey so far. 

I have been welcomed into the Stampin' Up family and have discovered support and friendship there. I have attended trainings and national events and am really excited to be heading off to Brussels in a couple of weeks for an International event.


From my first tentative classes at home, my programme has grown and continues to expand, with new things on the horizon. I have seen friends and family I already knew discover their creativity and it has been a huge joy to see my two girls embrace all things crafty and has given us something extra we can share and cherish.


And I have met lots of lovely new people, which has been a joy.
I run classes in a Supermarket, do after school clubs for the staff, have run fundraising events and birthday parties.

My craft room is bulging with stamps and ink and paper and ribbon and punches and dies and.............
I love them all.

I have a blog and a website and a Pinterest page

Thank you for being a part of my first two years and as I journey on, I hope you will continue to travel with me. Perhaps you would like to start a journey of your own. It is fun. I recommend it.

Helen
xxx


Tuesday 27 October 2015

Hello Santa


I am really quite particular about my Father Christmas images, but this one pasts the test. Round, jolly, good beard. And on the Santa's Gifts Stamp set he comes with a couple of friends.

For this little square card I stamped Santa and the little bird and coloured them in with markers. I then stamped and coloured a couple more Santa's and cut out some layers so I could decoupage him up. I added glitter to his white fur to give him some sparkle. I layered the image onto a mat of real red card and I also used the decorative label punch to punch out another piece of card. I cut this in half and attached the 2 pieces either side of the main card topper. I added the sentiments, also backed onto real red card and finished with some faux stitching.


How about a reindeer stamped in versamark and then heat embossed in gold. Add some red dazzling details to his nose and Rudolph is born. The stars in the background were also embossed.

Santa and his friends simply stamped and coloured in with some banners added for detail.


Santa makes a lovely tag for a simple gift bag made using the mini treat bag thinlit. I coloured his fur trim with the uniball gel pen.

And this Christmas tree is also in the stamp set. Nice traditional Christmas tree colours with brightly coloured baubles. For the background I inked up the Lucky Stars textured impressions embossing folder with daffodil delight ink before placing some white card in it and passing it through my Big Shot. I have made a couple of banners for this card using the banner punch. Like so many Stampin' Up punches, this one is really useful.

This is a lovely little stamp set that can so easily be overlooked. It is one of the sets that are found in the main annual catalogue, rather than in the seasonal catalogue.

Table built using Product Table Builder by The Crafty Owl - Independent Stampin' Up! Demonstrator.

If you think Santa could help you with your Christmas preparations, get in touch

Helen

Monday 26 October 2015

Upon Reflection


I have seen reflection techniques done various ways. For these I used wax paper. Many of us have it already in our stashes because of the intricate dies we cut. For us in the UK, our craft room is probably the only time we use it, although it was of course developed for culinary purposes - to wrap food.
In all of these examples I have stamped onto my card (watercolour card is best) with archival ink and then stamped the same image onto wax paper. The ink stays on top of the wax paper, so you can then turn it over and upside down, line it up under your original image and burnsh gently. The ink comes off of the wax paper and onto your card. It won't be a sharp, crisp, image, but then reflections aren't by their very nature sharp and crisp. All that remains is to colour your image by sponging, daubing, water colouring
For my tree, I dabbed colour onto the tree and then spritzed with water to give the blended colours effect. I added the ground and water with an aqua painter and then added in faint hints of the tree colour in the water.


The goose and the trees were also water coloured with an aqua painter.


I added "waves" along the top of my water and around the boat with the uni-ball Signo Gel pen (these pens are fabulous quality)


I love doing these cards. There are so may stamp sets that lend themselves to reflections.

If you have any questions on any of these cards, please comment or get in touch. I would love to hear from you.

Helen
xx

Sunday 25 October 2015

Cascade of Colour


We have made cascade cards at a couple of my groups recently. The bases are so easy to construct, from one piece of A4 card, but you can let your imagination run riot when it comes to decorating them. They are also one of the fabulous 3D cards that folds flat to go in an envelope - always a bonus. The theme and occasion can be anything you want it to be. 
For the autumnal card I took inspiration from a You tube video by a lady called Robin Feicht which you can see here
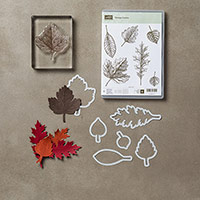
I tweaked her instructions slightly and I used the Vintage leaves stamp set and matching framelits to create my leaves and as you can see, I didn't scrimp on them. 
The colours of card stock I used were:
Cajun Craze, Cherry Cobbler, Pumpkin pie, Mossy Meadow, chocolate Chip.
I ran the 2 halves of the card base through the big shot in the woodgrain embossing folder before constructing the card and I repeated this with my front and back panel. I love the texture this creates.
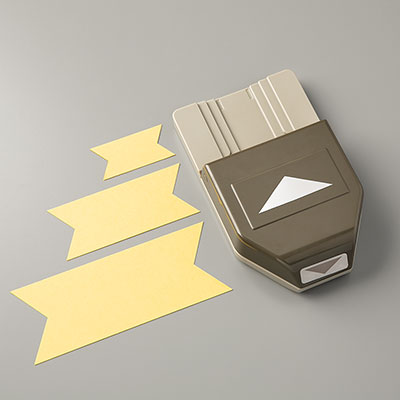
For my sentiment I used "choose happiness" from the stamp set of the same name and I also stamped the wooden banner from this set as well.


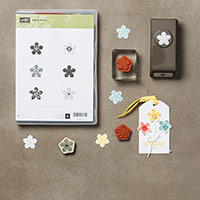
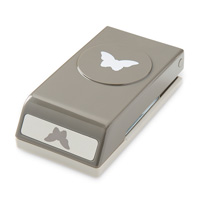
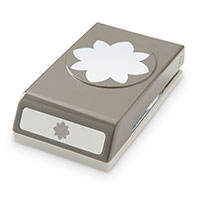
For the flowery card, I used a number of the flower/punch bundles in the catalogue and also the Papillion Potpourri stamp set and matching punches. These are staple sets in my collection and are often go to resources for adding a little something to a card, but they really come into their own when you combine them for a display like this.
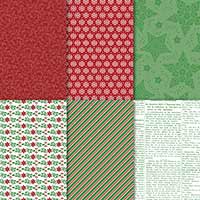
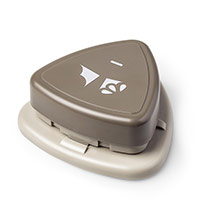
I used paper from the Brights Colour Collection DSP to cover the base and then picked out the matching inks to stamp the flowers and the butterflies. I shaped my front panels with the fabulous Curvy Corner Tripo Punch and stamped the sentiment from the always popular "Sassy Salutations" stamp set. The little flowers on the front panel were created with one of the small punches from the Itty Bitty Accents punch pack.
You will find all the stamps and punches I used listed below.


Table built using Product Table Builder by The Crafty Owl - Independent Stampin' Up! Demonstrator.


If you would like to order any of these sets, or would like an instruction sheet on how I created the base card, do get in touch.

Helen