Saturday 22 August 2015

Quick Catch-up

Well I have not been the World's best blogger over the last few weeks.

I have, however, had lots of fun. I have had a day at the seaside with my daughter and her husband, lots of crafting and building my website. I was lucky enough to be bought a Domain name for my birthday last year and now almost a year on, www.loveaduckie.co.uk is born. Click the tab on the menu bar to go and visit.

I have also been updating the classes page and adding in the programme of mid week groups I have scheduled. Take time to check those out too.


Thursday of this week is when I am holding an Open House to introduce the new Autumn/Winter Catalogue and some of the beautiful products you can get in it.


Thursday 6 August 2015

Quilting I can do


I would love to be able to produce one of the beautiful quilts that become a family heirloom. I long ago convinced myself that I can't sew, despite having successfully making clothes, curtains, cushions etc. One day, when I have some spare time, I will perhaps set about proving to myself that I am not a complete incompetent when it comes to using a sewing machine.

For now, I have turned to quilting with paper. That I am happy with. And we have such beautiful papers to play with.

These are all projects I created for Monday afternoon's class this week. 

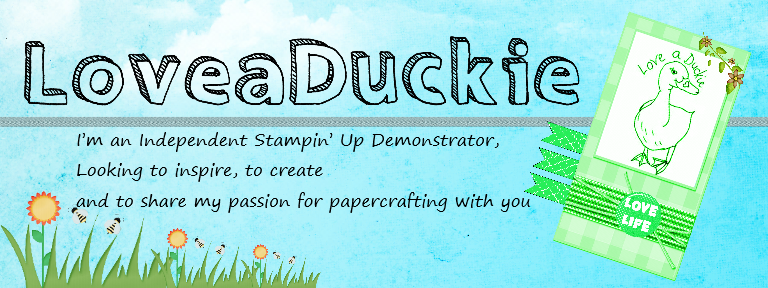
This one uses six small 1" squares of paper on a larger co-ordinating 3" square. Two of the smaller squares are cut into quarters diagonally and pieced together. I added some faux stitching and a separate mat with some bunting created with the banner punch. The paper was from the Pretty Petals Designer Series Stack.


You can find various tutorials on how to create starburst cards. 
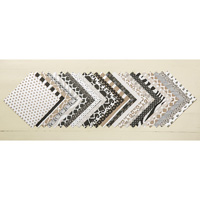
Here is one I found useful. I used the beautifully bright papers from the Cherry on Top Designer Series Stack.


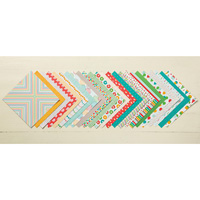
I found a card using this star design on pinterest (see it here) and used the picture as a guide to create my own version using papers from the Go Wild Designer Series Stack. It uses 5 different patterned papers cut into 1" squares. Eight of those squares are cut in half diagonally to form the butterfly effect in the four corners. It is useful to lay your design out before you make any attempt to stick it down.


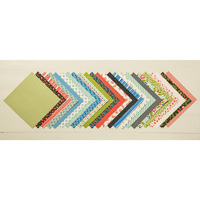
Another inspiration from Pinterest (I can spend hours browsing, can't you?). See the one I found here. Mine is completely different colours and again using patterns from the Pretty Petals Designer Stack.
 I started with a 1 1/2" square in the centre then usedstrips of 3/4" paper to radiate out, starting with the white patterned paper, laying it so it is flush with the top edge of the square. 


These were just a small proportion of the paper quilting patterns you can find examples of.  It is a fabulous and creative way of using up oddments of paper, because we never like to throw anything away do we?

Table built using Product Table Builder by The Crafty Owl - Independent Stampin' Up! Demonstrator.

I hope you will give paper quilting a try.

Have fun

Helen
xx

Wednesday 5 August 2015

Go wild, go wild, go wild in the country

If you are singing -you are showing your age. There are no prizes for naming the artist, just the satisfaction of a still functioning memory.

There are no snakes in the grass today, but there are some fantastic stamps from "The Wilderness Awaits" set. I fell in love with this set as soon as I saw it and knew it would tick some boxes for some of the men in my life when it comes to Birthday cards.
It also screamed watercolouring at me and that is what I have done in one form or another with all these cards. The Go Wild Designer Series Paper co-ordinates quite well with these images too.

This one was Stampin' Markers and a blender pen. I would of course naturally be drawn to the duck. I liked the way I was able to bring different colours in to create the duck's plumage and then blend it all together.


I did a watercolour wash on this one and stamped over it with Stayzon ink


And Mr Fox was stamped in Cajun Craze ink and the colour dragged out with an aqua painter. I then used Stampin' Markers for the sky and grass.


Table built using Product Table Builder by The Crafty Owl - Independent Stampin' Up! Demonstrator.


Today is Wednesday, so don't forget to check out the weekly deals to see what exciting products there are this week. It is always exciting if it is something high on your wishlist - and you won't know unless you look. Click here now!


If you are still struggling to name that artist.....it was Bow Wow Wow who sang "Go wild in the country". You can check it out here

Tuesday 4 August 2015

Birthday Invite

I wanted to make a quick card to showcase the "Build a Birthday" Stamp set for a workshop the other week. I decided to go classic black and white and I was pleased with the result. Because I was stamping in one colour I was able to build up the layers on my large stamp block and ink and stamp them together. Because it is a photopolymer stamp set, I was able to curve the greeting over the top to give the impression of a domed top to the cake, or a layer of icing. Then all that was left to do was to mat the topper onto black card and to create another black and white matted layer around which I tied some black bakers twine. Very simple, but effective


Talking of birthdays.....


Do check out the "Have a party" tab at the top and get in touch if you would like to have a Birthday Party for me.

Helen
xxx

Monday 3 August 2015

Simply Sublime Darling

I recently found myself with an unexpected free evening and I decided I would have a play with this stamp set - "You're sublime"

It is a fun little set with lots of potential uses. I decided to get out my Stampin' Markers and some crystal effects and with the addition of some 4" square card blanks, some mats of card and DSP, some punches and ribbon, I was away.

On this one I embossed the card mat and punched out a heart which I stuck on top of the bow. I added crystal effects to the heart and the caravan windows to glaze them..

The crab had glazed eyes and punched stars with smiley faces. I also added some stamped and punched banners.


I stamped and glazed some small circles for embellishments and glazed the portholes.


The toad also had glazed eyes, punched stars for embellishments and bakers twine

The wheelbarrow had punched flowers with rhinestone centres and a bow.


I had a lovely evening playing with this set. It would also be a good set for children to play with during these summer holidays. I can also see potential for some paper piecing with this one - perhaps for another day.

Here are some of the supplies I used.Some of the ribbon is now retired, but not forgotten.


Table built using Product Table Builder by The Crafty Owl - Independent Stampin' Up! Demonstrator.

Hope your Monday is bright and cheery

Helen
xxx

Sunday 2 August 2015

Waterfall

Back in ancient history, when I was first cardmaking, it seemed that waterfall cards were everywhere and very popular. They then seemed to disappear.
I have noticed, however, a resurgence in their popularity and so we decided to have a play the other Monday afternoon in our weekly group.

A couple of the cards I created as demonstration pieces had waterfalls that opened horizontally, like this one using the "Barnyard babies" stamp set for the toppers. the "Amazing Birthday" stamp set to stamp the "surprise" inside and the "Pretty Petals" DSP stack. 


And this one using the "Guy greetings"stamp set and "Go Wild" DSP stack.


For my third demonstration card I created a vertical waterfall, taking my inspiration from a card I found on Pinterest. You can see it here


This card used the fabulous "Sprinkles of Life" stamp set, that is the set you can buy and also support the Ronald McDonald house charity in the UK.. I also got to add in some of the beautiful watermelon wonder dotted lace trim. For this card I cut square toppers for the waterfall elements, stamped them and then trimmed around the top of the ice cream to give it its shape.

There are lots of instructions and videos available to help you create a waterfall card. Check out this one here as it has an easy mechanism system. 

If you have never made a waterfall card, then I highly recommend you give it a go.

Here are some of the supplies I used, but they can be created to fit any theme and for any one.

Table built using Product Table Builder by The Crafty Owl - Independent Stampin' Up! Demonstrator.

Have fun

Helen
xx